How To Install The Water Block Toilet Shutoff Kit In The Horizontal Orientation
Water damage is one of the most common and costly problems that homeowners and business owners face. It can happen anytime, anywhere, and for any reason. Maybe you have a toilet that runs constantly, wasting water and money. Maybe you have a second home that you don’t visit often, and you worry about what would happen if a pipe bursts or a hose leaks. Maybe you travel frequently, and you have no way of knowing or controlling what’s going on with your plumbing while you’re away. These are all valid concerns that can keep you up at night.
Fortunately, there is a solution that can put your mind at ease. It’s called the Water Block, and it’s a game-changer for anyone who wants to protect their property from water damage.
The Water Block is a device that can automatically shut off the water flow to your toilet if it detects a leak or a flood. It works by using a simple mechanism that measures the amount of water that passes through it. You can set the limit to any value between 1.3 and 13 gallons, depending on the size and type of your toilet. If the water flow exceeds the limit, the Water Block will close the valve and stop the water supply. This way, you can prevent a small leak from becoming a big disaster. The Water Block is easy to install, durable, and compatible with most toilets. You don’t need any batteries, electricity, or sensors. All you need is a wrench and some basic plumbing skills.
In this article, we will show you how to install the Water Block on your toilet in just 10 minutes. We will also explain how the Water Block works, how to adjust the settings, and how to test the device. By following these simple steps, you will be able to enjoy the benefits of the Water Block, such as saving water, money, and your property. You will also have peace of mind knowing that you have a reliable device that can protect you from water damage.
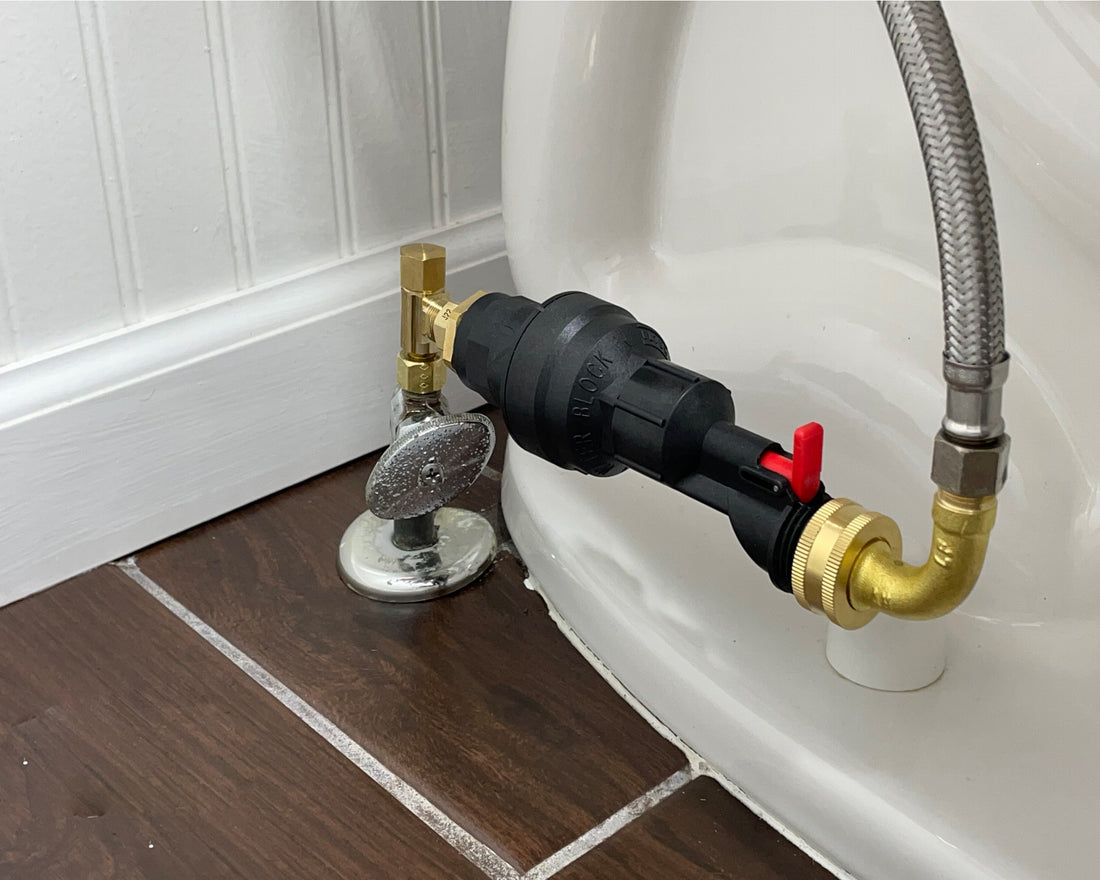
Water Block Toilet Shutoff Installation Instructions (Horizontal Orientation):
1.Turn off the toilet water supply valve.
- Locate the toilet's water supply valve, usually found coming from the floor or on the wall behind the toilet.
- Turn the water supply shutoff valve clockwise until it is fully closed. This will stop water flow to the toilet.

2. Disconnect the toilet supply hose from the shutoff valve.
- Loosen the connection between the supply hose and the supply valve using a wrench.
- Use a 5/8" wrench for a 3/8" nut.
- To loosen, turn the wrench in a counter-clockwise rotation.

3. Adjust the Water Block to your desired activation setting.
- Use the provided adjustment tool (white pick) to set the desired shutoff point on the Water Block.
- Insert the tool into the groove on the discharge end of the Water Block.
- Align the point on the internal clear arrow (inside the Water Block; red pin in the middle) with the desired shutoff setting number on the inside rim.
- Each setting represents 1.3 gallons of water. For example, setting 1 will shut off the water after 1.3 gallons, setting 2 after 2.6 gallons, setting 10 after 13.0 gallons, and so on.

4. Assemble the Water Block and Reset Device (if applicable).
- If your configuration includes a Reset Device, connect it to the discharge end of the Water Block.
- The discharge end is the one with the red indicator pin and settings dial, not the end with the mesh screen.

5. Attach the elbow fitting & stem pipe fitting.
- Attach the 3/8" elbow fitting to the discharge end (red pin side) of the Reset Device or Water Block (if no Reset Device is used).
- Attach the 3/8" stem pipe to the inlet side of the Water Block.
- Tighten the connection of the fittings, but avoid overtightening.

6. Attach the tee adapter to the toilet water valve.
- Attach the 3/8" tee adapter to the primary water supply valve.
- Tighten the connection with a 5/8" wrench, but avoid overtightening.
- Attach the solid brass cap to the top of the tee and tighten.

7. Connect the stem pipe and Water Block to the tee fitting.
- Slide the brass compression nut and sleeve onto the 3/8" stem pipe.
- Insert the stem pipe and Water Block assembly into the tee adapter.
- Slide the compression sleeve and nut onto the threads of the adapter tee.
- Tighten the connection firmly with a wrench to create a watertight seal. This should be the tightest connection in the system.

8. Attach the supply hose to the elbow fitting.
- Attach the toilet supply hose to the elbow fitting at the end or discharge side of the assembly.
- Tighten the connection with a wrench.
- 3/8" connection.

9. Double-check all connections and make sure they are tight.
- Carefully review all connections to ensure they are water-tight and secure.

10. Turn on the primary water supply valve.
- Slowly turn the water supply valve back on.
- Check for any leaks around the connections. If leaks are found, tighten the connections further.

You're protected now! If the Water Block activates, reset by shutting off the main water supply and decompressing the red lever on the reset tool. If it activates, double check your toilet and ensure it's safe to resume operation.
Below is a short video on how to install the Water Block.
If you need help or have any questions, reach out to us at: Support@HawkeyedWaterDefense.com. We're here to assist you with any inquiries about the product and its installation. Thanks for reading!