How to Install a Washing Machine Hose Yourself (Step-by-Step with Pictures)
How to Install a Washing Machine Hose
Featuring The Installation of The Flood Prevention Washing Machine Hose
Whether you're moving into a new home or replacing an old washing machine, installing a washing machine hose is a relatively simple task that can be done by most homeowners. This guide will walk you through the steps of installing a washing machine hose on any brand of washing machine, from disconnecting the old hose to connecting the new one.
The installation process is straightforward and can be done by most homeowners. However, if you do not feel comfortable installing the hose yourself, you should consult a plumber or other professional.
Estimated Install Time: 30 Minutes
Difficulty: Easy
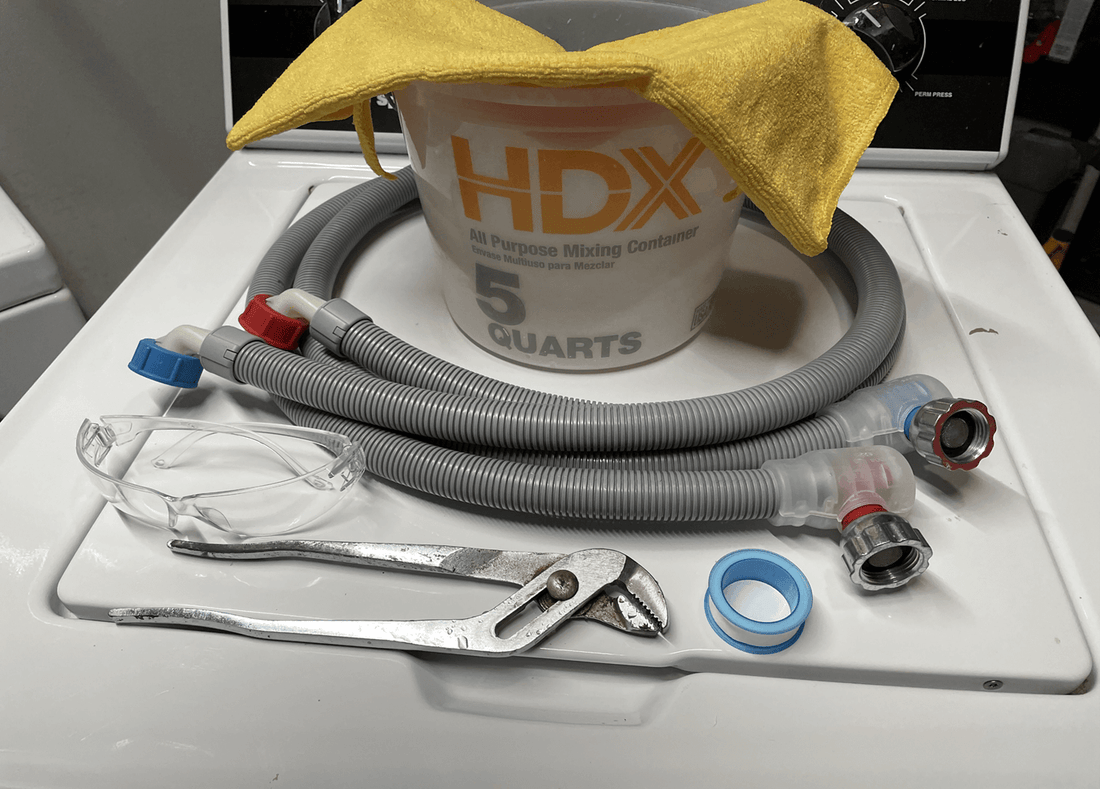
What You Need
- Safety Glasses
- Bucket
- Towel
- Thread Tape (Optional, Use on Brass Spigot Only)
- Pliers or Wrench
- New Washing Machine Hoses

----------------------------------------------------- + ----------------------------------------------------
Step 1: Unplug the Machine and Turn Off the Water Supply Valve
Unplug the washing machine from the electrical outlet and turn off the water supply valves. The water supply valves are located behind the washing machine, one for hot water and one for cold water. To turn off the valves, turn them clockwise until they stop. Be sure to turn off both valves, even if you are only replacing one of the hoses.

Step 2: Loosen the Supply Hose from the Spigot or Valve
Before you disconnect the old hose, place a bucket underneath the hose to catch any residual water that may drip out. Then, use a wrench or adjustable pliers to loosen the connection by turning the tool counterclockwise. Be careful, as the water pressure in the hose may cause water to spray out when you disconnect the hose.
Once the connection is loose, fully disconnect the hose from the spigot or valve.

Step 3: Disconnect the Old Washing Machine Hose from the Washing Machine Inlet Connection.
Using a wrench or adjustable pliers, loosen the connection between the hose and the washing machine inlet by turning the tool counterclockwise. Place a bucket underneath the connection to catch any water that may drip out of the connection.
Once the connection is loose, fully disconnect the hose from the washing machine.

Step 4 (Optional): Apply Thread Tape to the Threads On the Brass Supply Valve Or Spigot.
This step is completely optional. Wrap Thread/Teflon tape around the threads on the brass supply valve, in a clockwise rotation.
Note: Thread tape should only be used on metal connections and should not be used on plastic connections, such as the inlet connection on the washing machine.

Step 5: Connect the New Washing Machine Hose to the Supply Valve
Connect the new washing machine hose to the supply valve. Hand tighten the connection in the clockwise direction until tight. An additional ¼ turn can be applied using your wrench or pliers. Be careful not to overtighten the connection, as this can damage the hose or the valve.
Refer to the manufacturer's instructions to determine which end of the hose should connect to which valve. Most hoses do not require a specific end to be installed to a specific valve. However, some hoses, such as Flood Prevention Hose (used in this example), have a specific end that needs to be connected to the water supply valve.
Once the hose is connected to the supply valve, you can proceed to connecting the other end of the hose to the washing machine.

Step 6: Connect the New Washing Machine Hose to the Machine Inlet Valve
Connect the new washing machine hose to the washing machine inlet valve. Hand tighten the connection in the clockwise direction until tight. You can then apply an additional ¼ turn using a wrench or pliers, being careful not to overtighten the connection, as this can damage the hose or the valve.
Make sure to align and connect the red or hot water nut to the hot water inlet, and vice versa for cold (blue color code). Typically, the inlet valve on the machine will be labeled with "H" for hot and "C" for cold.

Step 7: Ensure the Connections Are Tight and That the Hoses Are Not Tangled
Before turning the water back on, perform a final check to make sure that all of the connections are tight and secure. Perform a visual inspection and make sure that the hoses are not tangled, kinked, or damaged. If you find any loose connections or tangled hoses, fix the problem before turning on the water.

Step 8: Final Step! Turn the Water Supply Back On and Check For Leaks
Slowly turn the water supply valves counterclockwise until they are fully open. Then, check the connections for leaks and drips. If you find any leaks, tighten the connections until the leaks stop.
Once you have checked the connections and are sure that there are no leaks, you can start using your washing machine again. However, it is a good idea to check the connections occasionally, as machine operations can loosen connections over time and lead to leaks and floods.

Frequently Asked Question About Washing Machine Hoses
How Long Do Washing Machine Hoses Last?
Most manufacturers recommend changing supply hoses every 3-5 years, regardless of material. You should inspect hoses occasionally for external damage that could lead to a burst. Washing machine hoses are subject to wear and tear from water pressure, heat, and chemicals. Over time, the hoses can become brittle and crack, leading to leaks or bursts. Leaks can damage your home and belongings, and bursts can cause flooding.
It is important to inspect your washing machine hoses regularly for signs of wear and tear. Look for cracks, bulges, and kinks. If you notice any damage, replace the hose immediately.
A consideration is to purchase the Eltek Flood Prevention Hose which will last longer than 5 years (up to the lifetime of the appliance or longer). This hose is also less susceptible to bursting or leaking and can automatically shut off the water if a leak in the hose does develop.
 "Replace After 4 Years"
What Is The Valve Connection Size For A Washing Machine Hose?
In the United States and Canada, washing machine hoses connect to standard household water supply valves. These valves are typically located behind the washing machine and have a 3/4-inch garden hose thread (GHT) connection.
How Long Are Washing Machine Supply Hoses?
Washing machine hoses typically range in length from 5 to 7 feet. This is long enough to reach the water supply valves behind most washing machines, while still leaving enough slack to avoid kinking or twisting the hoses.
What Is The Best Type Of Washing Machine Hose?
Flood Prevention Hoses are the latest technology revolutionizing the washing machine hose industry. These hoses are more durable than standard hoses, utilize dual layer protection, include leak detection and shutoff technology, last significantly longer than rubber and stainless-steel hoses, and are similar in cost to a generic hose.
Flood Prevention Hoses are made of robust materials (plastic exterior hose and nylon braided inner hose) and are even backed by an included manufacturer insurance policy. The hose has a built-in shutoff valve that will automatically turn off the water supply if the hose bursts or develops a leak. This can help to prevent water damage to your home and belongings. They are also easy to install and adapt to all washing machine brands.
Here are some of the benefits of using Flood Prevention Hoses:
- Peace of mind: Knowing that your home is protected from a washing machine hose flood can give you peace of mind.
- Easy installation: The Flood Prevention Hose is easy to install, even for DIYers.
- Durable construction: The Flood Prevention Hose is made of durable materials and is backed by a manufacturer insurance policy.
- No battery required: The Flood Prevention Hose does not require any batteries or electricity to operate.
- No mechanical parts: The Flood Prevention Hose has no mechanical parts, so there is nothing to break or wear out.
- Operates like a standard hose with no water restrictions: The Flood Prevention Hose operates just like a standard washing machine hose, with no water flow restrictions.
What If I Need More Help?
For more help, you can reach out to our team at Support@Hawkeyedwaterdefense.com or contact us through our contact page. We would be more than happy to help answer any questions about installing a washing machine hose or questions regarding the Flood Prevention Hose.
Disclaimer:
1 comment
Oh c’est cornabite